


 آموزش کلاه تولد برای تم پرنسس
 آموزش کلاه تولد برای تم پرنسس
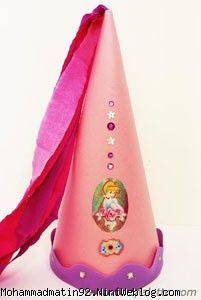
 |
Draw a quarter circle with a radius of about 14 to 16 inches using a pencil tied to a string. It will be helpful to tape the string to the pivot point. To ensure that the quarter circle makes a cone hat that fits perfectly on your head, you may practice first with newspaper. |
||
 |
2. | Cut out the quarter circle. | |
 |
3. | Trim off a little bit from the tip or pivot point of your quarter circle. | |
 |
4. | A princess cone hat usually has a trailing veil or streamers at the tip. To make one for your hat, you can use any of these materials: a.) Trailing streamers- cut 5 to 6 long strips (approximately 1 to 1.5 inches wide) of crepe paper or curl some fabric ribbons. Gather them on one end, and twist to compact that end. |
|
 |
b.) Dainty veil- cut specialty tissue paper or any sheer fabric into a rectangular piece (approximately 20 x 30 inches). (1.) Fold lengthwise and pinch 1/3 of the way along the folded edge; (2) Hold up the material by the pinched end and arrange the folds of the flowing material; (3) Twist or tape the paper/fabric at the pinched end. | ||
 |
5. | Tape the trailing veil or streamers onto the tip of your quarter circle. | |
 |
6. | Roll the quarter circle into a cone and staple at the base. | |
 |
7. | Glue or tape along the seams. | |
 |
8. | Add a chin strap if you like. Punch opposite holes along the bottom edge of the hat and attach an elastic string. | |
 |
9. | Let kids have fun and express their creative flair by providing them with lots of materials to work with like ribbons, boas, sequins, stickers, rhinestones, glitter glue, fabric scraps, craft foam, etc. | |
 |
You may also stick with a basic design since the trailing veil already gives your hat enough style. | ||


مطالبی دیگر از این نی نی وبلاگی