


 طرز درست کردن کیک کیف ( تصویری ) نمونه 2
 طرز درست کردن کیک کیف ( تصویری ) نمونه 2
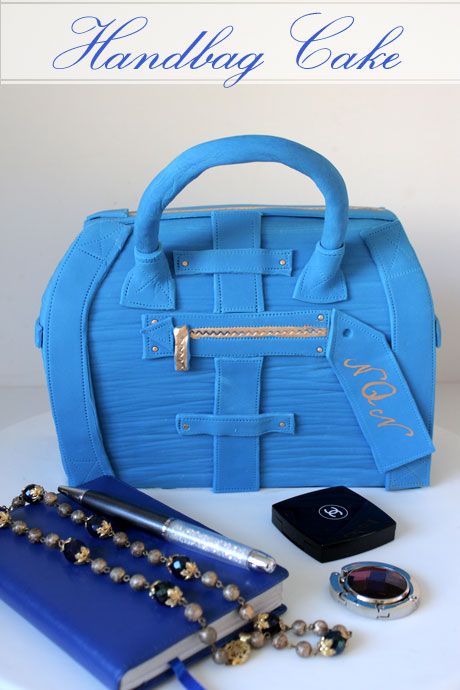
.

!
 i!
i!

Trimming off the crusty or hard bits at the top with serrated knife

Cutting cake into three layers
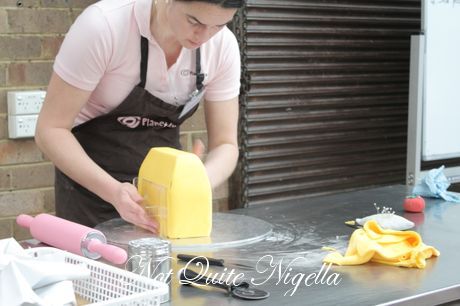
We all start off which a 8x8 inch chocolate mud cake. For novelty cakes, a firm, dense cake like a mud cake is necessary as it needs to support decorations and also maintain the integrity of the structure. For that reason sponges and similar cakes are not used. She starts by slicing it into three layers horizontally. To do this, mark the layers using the back of a long, serrated knife and then moving the cake start cutting across. As it is a stainless steel knife, you simply watch the part of the knife that is closest to you and the top of the blade will follow.

Brushing layers with sugar syrup to keep moist

After whipping the ganache in the corner, it becomes a lighter colour
To give it extra moisture brush it lightly with a sugar syrup (if you use a fruit infused one, make sure that the fruit pieces are strained out). Take your ganache filling. As it is Winter here in Australia at the moment, the ganache will set fairly hard quite quickly. So microwave the ganache on low heat until the corner of the container is soft and then whip it up incorporating some of the firmer but not hard areas of ganache to give yourself a fluffy ganache frosting that is also very spreadable.

Ta da!
Spread ganache on two of the layers and stick them together to put the cake together again. If your cutting isn't done smoothly they replace the layers in the same order much like a stacking puzzle (yes mine weren't!). We go back to our benches and do this for ourselves.

Slicing up the cake-clean serrated knife with paring knife between cuts

First check to see that the pieces stack up to make the shape that you want

Then disassemble and spread ganache and restack the pieces using the ganache as a "glue"
Then comes the part where I almost had a minor freakout. The cutting of the layers. Jessica warns us to always clean our serrated knife using the paring knife between cuts to avoid "dirty" cuts. She cuts it into just under a half and then cuts the second one into four pieces. She then stacks the pieces on top of each other until we reach a sort of rectangular tower shape. She places two pieces on the top. She then removes them and ganaches between them using a back and forth motion, never a patting motion as that is the quickest way to pick up crumbs. I suspect bricklayers would be very good at this part! We all go back and do this at our benches.

So cut in two pieces, one slightly larger than the other. Cut off extra piece and line the pieces halves up

Cut one half into five pieces

Then practice your stack before ganaching them together

Shaping the sides for a tapered look
Once the ganache has set (10 minutes or so), the next part is the shaping. Jessica looks at the finished product (it always helps to have one as an example and a woman actually brought in her Kelly to model a cake on!) and compares and sees where it tapers in and marks it with a paring knife. All of the little gaps are filled with crumbs and the cut off pieces of cake which can be adhered with a tiny amount of ganache if needed although the mud cake is moist and will often stick together of its own accord. At the very base of the cake she slices into it giving it an indent where we will tuck the fondant under.

Placing on the presentation board
We then place some ganache on the presentation board and then adhere the cake onto it which by now looks like a house!

My house ahem handbag!

Spreading with ganache coating to give an even surface

Using a metal smoothing tool to ensure that it is as smooth as possible

Finished (and yes mine is slightly lopsided)
After this is done Jessica shows us how to ganache and buff the cake. This is important to ensure that the fondant has a completely smooth surface to rest on as any lumps can show through the fondant. The trick is to smooth the fondant on firmly with a palette knife and then use the metal smoothing tool to ensure that the finish is as smooth as possible.

Dip a finger of fondant into the colouring gel

And then knead it in using a circular motion
Now comes the muscle bit. As I am short, I get a foot stool to help to incorporate the colouring gel into the fondant. I choose a blue and decide to have the bag all in the one finish, as a Louis Vuitton Speedy is all in one colour. I also want to make it in the Epi leather pattern so I will have to add the patterns on as soon as the fondant is added. After much exhaustion and a lot of kneading, my fondant is coloured (and we get to keep the fondant that we make, YAY!).

Kneaded fondant
It's not quite the blue of the Epi but it will do as the darker colour that is needed, the harder it is to work with. She suggests avoiding red, blacks and browns as the colouring in those shades is so intense that it needs to rest overnight.

Measuring the cake with a rolling pin
We then brush the cake with some sugar syrup ready for our fondant. We knead the fondant to soften it and then dust the table lightly with cornflour, place it presentation side up we roll it out into a rectangular shape making sure to turn it regularly to pick up the cornflour on the table. To measure the size of the fondant for the cake Jessica uses the rolling pin size as a guide. Sliding her hands and arms under the fondant, she gently blankets the cake with the fondant.

Lifting the fondant onto the cake

Smoothing the fondant onto the cake

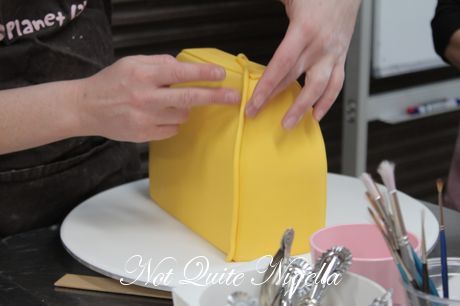
Tucking in the sides of the cake
She creates two seams that sit at the back of the cake by folding it over. She then pats down the fondant onto the cake by using downwards motions and then cuts off the excess smoothing down the edges. Lastly she trims the edges of the icing flush against the cake. Then she buffs the cake using the acrylic smoothing tool. Airholes are removed with a fine pin on an angle. Marianne explains that sometimes airholes can grow even once lanced so it's important to keep an eye on them as they can stretch the fondant.

Cutting off the excess

Buffing the joins

Cutting off extra fondant
I manage to get my fondant on but not without a bit of drama. I didn't put it on properly so I had to remove it but by now there was some chocolate on the back of my fondant so I couldn't roll it again. Jessica explains that it's easy to deal with. Simply discard any pieces of fondant that have chocolate on them and then reroll it.
Buffing the fondant until smooth and removing any air bubbles

Making the "epi" pattern
Using the thinnest side of the decorating tool I make stripes across the fondant filling in gaps while the fondant is still soft.

Slicing off extra white fondant on base
It then comes time to add on the base fondant, we roll out our white fondant and measure the size of our cakes leaving a couple of centimetres to allow for stretch. We slice out that size and carefully lift the white fondant over the cake itself and trim the edges to fit.

Cutting out pieces

Adding the top zipper

Adding the stitching pieces
Now comes the fun bit-decorating the cake! We first measure the top dimensions of the cake to create the zipper. We use a ravioli cutter to make the actual zipper and then simulate the stitching using a stitching tool. We then cut four strips to make the side contrast panels. These are all adhered using a light brush of water. Jessica also shows us how to do a piping edge should we want to do that.

Rolling piping detail
Affixing piping detail

I decided to add the stitching edge to mine

The secret to the handle!

Measuring the circumference of plastic tubing with fondant
Now comes the tricky bit-the handle! I bet you were wondering like I was how on earth that happened like I was. Well the trick is flexible tubing and wooden dowel rods! Firstly measure the circumference on your plastic tubing by using a piece of fondant or tape measure. Then slice out a length with that width plus a little extra.

Place the fondant over the plastic tubing like a sheath

And buff the edges together
Stick your two dowel rods into each end of the tubing. Brushing some sticky piping gel onto the plastic tubing to ensure that the fondant sticks to it. Stick one dowel rod into some foam and wrap the fondant around the plastic tubing and then buff the edges together. Then we mark the places where we want to stick the handle and trim the dowel rods so that about 2 inches remains.

Mark where you would like to place the handles and insert them

Use tweezers or pliers to push the last bits in
We then stick the handles into the cake finishing the job with tweezers or pliers as the fondant is still soft and cannot have pressure applied to it. They are then finished off with two squares of fondant that have stitching details on them.

Back handle

Adding final touches to the back handle
The back handle is much easier. it is simply a sausage stuck on with water and two squares with stitching detail. I am pleased as it is finally starting to look like a bag! I look round and everyone's bags are different with different colours and different details and they all look magnificent.

Making the luggage tag
The final fondant detail? The luggage tag of course. I was going to put Mr NQN's name on it but he is shy so I just put on NQN as Lorraine wouldn't have fit.

I think I prefer the back :P

Everyone is busy finishing off their cakes. I then finish it off with some gold paint detail on the zipper and it is photo time! With cakes like this it's very tempting to keep going and going but viola, here is mine!


My certificate (please note blue dye under fingernails-haha!)